To get you up to running speed, I've been running an online Etsy shop since I closed my brick & mortar shop. I'm selling my remaining inventory, some new inventory, as well as the handmade items I've decided that I can part with. This includes quilts, table runners, and other fabric items. Even after a year and a half, I still have items to list. If you get a chance, please visit my store at www.etsy.com/shop/ChesterCountyQuiltng.
Today, due to a friend's request, I'm going to post a step-by-step tutorial on my Never-Ending Binding. The binding isn't actually never-ending, but I call it that because you can't tell where it started and where it ended. Unlike some bindings that require special tools, mathematical equations (which I'm very good at, by the way), or overlapping the end of your binding strip over the beginning edge, my technique gives you a smooth binding that goes all the way around with minimal trouble. I like presenting it in photo format so you can see each step along the way and really get a good look at what needs to be done. You've probably done most of it this way already. My special twist comes when you connect the two ends.
So, here we go:
 |
| Here's what your seam should look like. |
 |
| Trim off the excess fabric, leaving a 1/4" or 3/8" seam allowance. |
 |
| Press the seams OPEN. Do not press to one side like you did while making your quilt. We are trying to eliminate any excess bulk in the binding. |
 |
| Now, press your binding in half, wrong side in, along the entire length of your binding strip. |
 |
| Stop sewing 1/4" before you reach the corner of your quilt. I like to back stitch here for the sake of security. Cut the thread, and remove from under your presser foot. |
 |
| Hold your finger on the corner, and then pull the binding down towards you, leaving the mitered fold in the corner. The folded binding should line up with the edge of the quilt. |
 |
| Press the folds down to crease them. |
 |
| VERY CAREFULLY, cut the top half of the folded binding only, not both layers. Your cuts should be about 1/4" to 3/8" away from the pressed crease. Cut until your reach to fold. |
 |
| Here's what your two cuts should look like at this stage. |
 |
| Now, open up the binding and finish your cuts, continuing along the same angle you started in the last step. There will be no pressed fold to guide you, so just eyeball it. Piece of cake, right? |
 |
| Here's what your cut ends will look like. |
 |
| Here's what your pinned seam will look like. |
 |
| Set your seam under your presser foot, remove the first pin and sew. |
 |
| Carefully sew your seam, trying not to stretch the bias. |
 |
| Here's what your sewn seam will look like. |
 |
| Carefully press your seam allowance open. Remember, you are working with stretchy bias. |
 |
| Fold your binding in half, and press it back into shape, aligning it with the edge of your quilt. |
 |
| Here's what your biding should look like at this stage. |
 |
| Finish stitching your seam closed. |
 |
| This is what your closing seam allowance should look like. Notice that the 1/4" gap we left has disappeared, resulting in a nice smooth binding with to puckers or tucks. |
 |
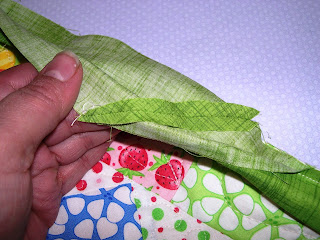
| Take a stitch into the very edge of the binding fold from bottom to top. Your binding should just cover the machine sewn seam. |
 |
| Using a tiny whip stitch, stitch until you reach the seam of the side on your left. |
 |
| Carefully miter fold your corner. |
 |
| Stitch the mitered fold closed, continuing to use tiny stitches. |
 |
| Here's what your turned corner should look like. |


Thanks, Ramona! I'm going to be referring to this quite often!!
ReplyDelete